 Grab my guide to the 10 main ways to grow traffic and optimize to boost sales.
26 Ways to Make More Sales with Your Shopify Blog

September 11, 2018 / Updated: January 17, 2023

I am a big proponent of blogging for your business, yes, even for ecommerce businesses with online shops! Your blog can be a great way to get more website traffic, but the only way you’ll make more sales with your Shopify blog is if you know how to properly promote your blog posts! I really hope you aren’t just writing and writing with no one reading.
So! You got your blog up and running, you decided on a schedule, you filled your editorial calendar with post ideas, you started writing and publishing and yet… it doesn’t feel like the blog is working. It’s not bringing you traffic, no one is commenting, and certainly nothing you’ve done has gone viral! Guess what? You may be talking to yourself.
Maybe you have endless interesting, valuable, and witty things to say, but if you’ve gone to a party and closed yourself in the closet to say them, you’re not going to get much response. Sure, people could go over to the closet and knock on the door, but who’s going to do that? There are chips and dip to be had!
This article is about how to get your blog out there mingling with people who want to hear what you have to say. Metaphor over: we’re going to talk about how to drive traffic to your blog, so all the hours you spend writing, editing, and posting is going to make you money.
Does a using a Shopify blog really help with your search engine ranking?
People often ask me if they really need to blog to promote their business, and I tend to tell them about what I’ve seen with mine. I have a single post that I wrote in no more than 30 minutes over four years ago, and it has consistently gotten hundreds of visits per day since Google decided to like it (9 months after I wrote it). That’s thousands of free visitors I get every month.
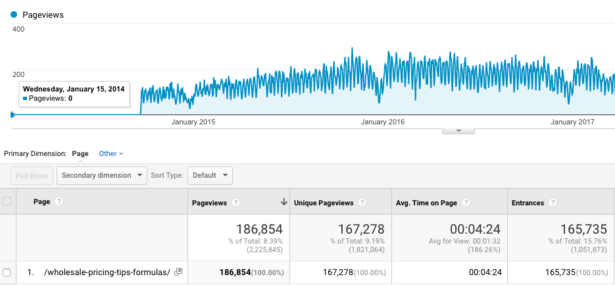
The left side of this Google Analytics graph, where it’s totally flat is what happened after I wrote it in January 2014. Nothing. In September of that year, Google took notice of it. The dips in the graph are around December and January each year, when people don’t tend to be googling the term “wholesale pricing” as much.
The traffic keeps growing and I keep tweaking the post to improve it and get people to sign up for my newsletter. As I adjust it, I hope very strongly that I don’t “ruin” the post somehow and make Google sick of it! But look, I added a nice Pinterest-style graphic to it and kept the info updated, and Google rewarded me with this little dude:

“How can I mark my page as a featured snippet? You can’t. Google programmatically determines that a page contains a likely answer to the user’s question, and displays the result as a featured snippet.”
The funny thing about this post is that it’s nowhere near being my best or most informative post. In fact, the info doesn’t seem that helpful to me, so I recently beefed it up with a big fancy pricing guide PDF.
As you can see, this is a fun amount of traffic to be getting. The visitors aren’t all perfect for us, but they’re fairly well targeted (they are probably selling a product, though perhaps not a creative, design-oriented product, like we specialize in), and some of them do sign up for my mailing list. And that’s just one of hundreds of posts on our blog, each bringing in their own traffic.
Google likes regularly-updated sites
Hitting it big with a lucky keyword that Google ends up liking is awesome, of course. But even if you don’t get that lucky post, a blog still helps with your SEO (Search Engine Optimization) in other ways. One factor Google looks at when deciding how highly to rank your site in any search is how regularly your site is updated. Adding a new blog post weekly is only going to help.
Support your social media posting with a home for the content
And what about all that work you’re doing on social media telling people what you’re up to and trying to drive traffic back to your site? Sending people to a blog post is a great way to keep them interested. And that post sticks around forever, while most of your social media posts get lost in the stream after a while and stop working for you.
What makes people share your work?
Let’s not forget sharing. I know that people do share products with their friends, family, and fans. But if you don’t have a blog, you’re missing all the people who like to share inspiration, advice, ideas, and more that you could be writing about in your blog. Blog content tends to be more share-able and save-able than plain old product information is.
Promoting a blog post
If you are serious about building traffic to your website, you may now be thinking you should work on improving your blog. But please don’t spend all your time writing! Having a blog without a plan to promote each post is going to be an exercise in wasted time.
Writing the darn blog post is just a small part of making a blog work. I’m kind of sorry to have to break this to you, because for me, the writing is the fun part and then a lot of the rest of it is just like, ugh. But I do want people to see my writing, so I do a whole heap of other things for each blog post we write.
In fact (especially at the beginning), you should be spending more of your time promoting your blog than you do writing the posts. If you spend 80% of your time writing and 20% of your time promoting, it’s going to take a long while for your blog to get traction.
You should be getting sales from each post you make. Here’s how to make sure this happens:
26 Things to Do to Make Sure Your Ecommerce Blog Is Working for You
Today I’m sharing a detailed peek into the 26 items on my blogging to-do list to spread the word around and get people talking. These are the things to do to get yourself out of that party-adjacent closet and onto the main dance floor:
- Article purpose – what action do you want the reader to take?
- Article focus – determine the topic of the blog post
- Providing value – ways to create quality content
- SEO keywords – how to research keywords that will work for you
- Content upgrades – when to use bribes to convert
- Headline – why to spend time on the headline in advance
- Collaborate – when to bring other people in to contribute to your post
- Guest posting or syndication – how to bring in fresh new readers
- Fit it on your editorial calendar strategically
- Rough draft – hint: yes, you’re going to edit this later
- Call to action – how to make it compelling
- Cross-link to others – an easy way for cross-promotion
- Edit and proofread – and the tools I use
- Photos and graphics – how to make them effective
- Social media content – what to prep to promote your post
- Optimize with headers and alt tags
- Cross-link to yourself – an easy way to keep people on your site
- SEO double check – how to be diligent without being penalized by Google
- Cross-promote – why to let people know about mentions
- Ask for favors – when and how to ask influencers to share your post
- Social media (in person) – how to create a buzz
- Social media (scheduling) – how to let robots take care of the rest
- Mailing list – why your list is your most valuable marketing asset
- Syndicate – how to let the post get back to work again
- Write a spin-off – keep actively linking to the post
- Email series – introduce new subscribers to this post
Lest you think I’m at my computer 24 hours a day working on our blog, I will confess that I do not do these things for every post. Maybe one day, after hiring an assistant! I have a lot of other business building to do, and the blog sometimes gets neglected.
But the following is what I do when I know I am writing a “showcase” piece, such as our 260 blog post ideas article. One that I’m going to ask people to share and is going to be a big deal for us.
All these steps aren’t worth it if you put together a quick post in 20 minutes about a funny note from a customer. But if you spent three hours researching, planning, and doing a whole photo shoot, and you’re promoting something big for your business, you will absolutely want to take the time to spread that post out in the world. When I say big deal post, think new product collection or collaboration or any other important thing for your biz.
Here’s more detail about the steps I take for each important blog post. Do these, and you’ll be sure to make more sales from your Shopify blog in no time!
Here are the things I do to make the most of each post.
1. Determine the purpose of your blog post
Before you write the post, you need to look at the big picture. The most important question to ask yourself is so important, I’m going to give it a line of its own:
- What do you want this blog post to do for you?
Blogging is a powerful way to drive traffic to your site. As you’re about to find out, it’s a whole heck of a lot of work. You don’t want to do all of this work unless you’re pretty sure it’s going to help you to meet an objective. Spending four hours on a blog post that doesn’t intend your reader to do anything once they’ve finished reading is a waste of your time.
So, the first thing you want to do is figure out what you want the blog post to do for you. I’m speaking to product-based businesses, since that’s our area of interest at Aeolidia. Product-based businesses usually want to sell a product. Perhaps a specific product, a new line of products, a collaboration with another company. But usually you want someone to buy from you. You may also have something else in mind.
Actions you may want your reader to take:
- Buy a product
- Join your mailing list
- Share your blog post with their friends
- Shop your sale
- Like your new Facebook page
- Attend your pop-up shop or other event
Once you know what action you want your reader to take, you can do some more planning (before writing!) to make sure your post will have an impact and be worth all the time you put into the text, photos and graphics.
2. Come up with the article focus.
This is an easy one. What is the article about? In our case, we often want to showcase a client project. We know all about the project, and we need to decide which angle to write about (the path to choosing the right business name? The big realization the client had midway through design? A before and after showing the transformation?).
You want to steer away from stream of consciousness and make sure that your writing has a focus that relates to your objective.
3. What value are you going to be offering your reader?
This is another huge one. Every time you show up on the internet to promote your business, you need to bring value. What the heck is value, you ask? Value just means that you have written something that your reader will be glad she has read. You’ve given her a little gift. If it’s valuable enough, she may want to share it with her friends. Value can be:
- Actionable information: tutorials, how-tos, ideas for her home or life
- Interesting information: process details, intriguing product history, best vacation spots with kids
- Inspirational content: motivational, beautiful, cheerful
- Aspirational: beautiful homes, success stories, things people want
- Cash value: discount coupons, sales, giveaways, contests
- Entertainment: stories, jokes, funny or interesting photos
- Community or connection: the “I’m not the only one!” feeling or a way to bring your readers together
4. Decide on a keyword for search engines.
I approach each post hoping Google will sink its teeth into it and start sending me a barrel of traffic. This has only happened for me a few times, but when it does, it’s good.
First, a keyword doesn’t have to be a word – it’s usually a phrase. So you might want to try something like, “best baby bonnets” or “spring break activities” or “vintage tea towels.”
When you’re thinking of your keyword, you need to imagine your target customer. She wants your exact product and she’s going to Google. What’s she going to type in? She might not know what the word “himmeli” means, for instance, and may be typing in, “geometric brass plant holder.” Forget your insider info and jargon when thinking of keywords for your customers. By the way, this doesn’t mean you shouldn’t use the word “himmeli” in your blog post – you just want to have an option for people who don’t know it.
For extra credit, don’t just guess at what keywords people are searching for. Try to find out. The easiest way is to start typing some of your ideas into Google’s regular search box. Their “suggest” feature will start trying to complete what you’re typing with the most common searches.
If you want to go deeper into this, you can get some keyword ideas from Google’s Keyword Planner. Here are Google’s instructions for how to use their planner (and if you find this confusing, keep Googling for a “how-to” article – lots of people have explained it, some more clearly than others). You can also use Google Trends to see what people are interested in, and how your keyword idea has changed in popularity.
Once you pick your phrase, you can search Google for your phrase, to see who your competitors are. Make sure you are offering information that is new and different from what is there. Maybe more specialized, or with more detail. For instance, if there is a post with 20 ideas for decorating a home office, you can write one that has 50 ideas. Or you could write one that has ideas for decorating a home office with limited space.
Now that you’ve chosen your keyword, don’t go nuts with it and use it a million times – Google will probably think you’re a spammer. It is fine and good to use variations of your keyword (“best places to camp” and “favorite campsites,” for example), rather than just the same keyword over and over. If you’re writing a quality article, this should naturally happen and not be a lot of extra work. Think about these important places for keywords:
- Your article’s title
- Your article’s URL (mysite.com/vintage-tea-towels)
- The alt tags for your photos (more on that later)
- A heading tag in your article (more on that later)
- The meta description (more on that later)
5. “Content upgrade” or gift for taking an action.
Consider whether you’re going to kindly bribe your readers to do something such as sign up for your mailing list. For most ecommerce blogs, you want someone to buy your product, and a bribe won’t be necessary. For my service-based business, it’s unlikely that many people will be at the right place with their business to hire us the first time they read a blog post, so we like to introduce them to our mailing list. If you’re focusing on building your mailing list, try a freebie that helps them shop for your product, use your product in their home, etc.
One effective way to get new subscribers for our mailing list is to give readers a “content upgrade” – more information on the same topic of the post, given for free in exchange for sharing their email address and letting us contact them when we have interesting information to share. You’re reading one right now. ?
Make sure that your content upgrade doesn’t feel like a bait and switch. The last thing you want is for your reader to feel disappointed by what they get after giving away their valuable email address. A good content upgrade can take a long time to put together, so I make sure to have that in my plans from the start if I’m going to do it.
6. Now we write the headline.
What?! Why are we writing the headline before we’ve written the article? This isn’t necessary to do – you can write the headline at any point. But I find that if I start with the headline, I can put more attention into what people want to know and why they’re clicking over to my site, and it helps me shape the article as well.
Your headline is important. I’ve seen recommendations to spend more time on your headline than on your article. There is no point to the article if people don’t read it, and the headline is usually the “bait” used to bring people over to the article. So writing a dull, dry headline puts you at a disadvantage (though you always want to be clear).
You want your headline to be intriguing and understandable. I use CoSchedule’s free Headline Analyzer tool, and improve my headlines based on the ratings of my attempts. I stop before it reaches ridiculous “clickbait” levels of catchiness, and I double-check that people would have a decent idea of what to expect before clicking. Then I know I have a good headline.
7. Ask other people to contribute.
This doesn’t happen with every post, but it can make posts more interesting if you have another person’s perspective. We often ask for quotes, testimonials, photos, or do interviews with people. For these posts, we want to ask them well in advance, so we’re not up late the night before posting trying to get everything together.
When asking people to contribute to your blog, make sure there’s value in it for them, too. Link back to them, sell your audience on them, reciprocate on their blog – whatever makes sense for your relationship with them.
8. Where could your post go besides your blog?
You may want to consider making this a guest post on someone else’s blog, to attract a new audience. Or you may want to post it on your blog, but ask someone else to syndicate it (publish it again on their site). Plan for that now, and pitch the post idea to your intended blog before you write it.
One word of caution when syndicating or duplicating content: Google doesn’t always like this, so one of you needs to set the post up so that Google doesn’t “count” it. When I repost an article that someone else already posted, I set the post to “noindex” in my WordPress admin. This way, neither my site or the other person’s site get penalized by Google for being a spammer.
My personal method when I guest post is to put an excerpt up on my blog the same week that the other blogger posts my content. The excerpt links to them. After two weeks or so, when the content is no longer fresh, I swap out my excerpt for the full article, and state at the end of the post where it was originally posted, with a link back. This is an easy way for me to let my readers know I have new content elsewhere for them, and it keeps the info on my site (without “scooping” the other blogger), so it will always be available to my readers no matter what happens to the other site.
9. Put the post on your editorial calendar.
If you’re taking blogging seriously, an editorial calendar is going to allow you to do your best work. Plan each post for a strategic time based on your seasonal products, product releases, other events or collaborations you’re doing, and make sure to vary the content of your blog so you aren’t posting clumps of the same type of posts.
10. Write a rough draft of your post.
This is when you plop everything you know and want to say out of your keyboard and onto some kind of virtual paper (I write simple posts in WordPress, and more involved ones start in Evernote). Or maybe you prefer writing in a notebook and typing it up later. If the post is complicated enough, you might even want to start by creating an outline of your main points and sub-points, then writing the rough draft.
Don’t worry too much about search engine optimization at this point (though you should have your main target keyword in the back of your mind as you write – and you should make sure the article you’re writing makes sense with the title you gave it). Your purpose should be for your reader first, and Google second. Google agrees with this, because they want to find the content their users value, so if you jam your keyword all over your article, Google is going to penalize you for trying too hard. Keep it natural, and use your keyword (and its variations) where it makes sense for your reader.
11. Craft your call to action.
Remember when you decided what you wanted your article to do for you? Now it’s time to make it happen. Tell your reader what you want them to do next. And do it in a way that’s irresistible without feeling salesy. What’s in it for them? If you do it right, they should be tripping over their own feet to get to the next step.
Spend some time on this, taking good-natured advantage of your customer’s desire, curiosity, interest, etc., and making sure you’re delivering something during the next step that makes them glad they took action (P.S. I hope you’re enjoying this lovely guide I made for you!).
I also put a custom newsletter box on each post, letting people know if they want more on that topic, to join our newsletter.
12. Make sure you link to anyone you’ve mentioned.
Doing a favor for another blogger, business owner, customer, shop, craft fair, etc. is a great way to get their attention and maybe build a relationship that could be helpful to you in the future. And people just love knowing when they’re being talked about on the internet! So send ‘em some traffic, there’s enough for everyone. They may even re-share your article with their audience.
13. Edit and proofread!
Now your post is written, and you’re going to proofread it. I like to run posts through the Hemingway app when I want to improve my clarity. When I get really serious on a “masterpiece” type post, I print it out onto scrap paper and sit down in a cozy chair with a red pen. Don’t trust your spell check! You need to proofread to make sure there are no mistakes (for instance, in the first draft of this article, I accidentally typed “automaton” instead of “automation,” which spellcheck thought was just fine).
14. Now it’s time to add images.
These could be photos, or graphics you create with text or illustrations. I use Photoshop to do this, and I’ve heard good things about Canva. Make sure your photos are bright, clear, interesting, and the right size for your blog. You want them to fit the full width of your post, so people aren’t stuck squinting at shrimpy images.
Make at least one of your images Pinterest-friendly: a vertical image, and if it has text, it needs to be large enough to be readable at Pinterest’s small “thumbnail” size that they show on the front page. Zoom out on the image in your graphics program to about Pinterest size to be sure it’s still legible.
15. Prepare other social media graphics.
I create a special graphic for Instagram that’s the right dimensions (square, horizontal, or vertical), and prep that to post using CoSchedule. Maybe Facebook is important for your business and you want to make a special Facebook graphic. If you plan to upload and post images manually for your post, you can modify your existing photos to be just right for the social media platform you’re interested in (or make something new).
16. Optimize with headers and alt tags
Dividing longer posts up with headings is a great way to keep your readers’ attention, and help those that may be skimming to see if they’re interested. Google can also understand your articles better if you divide them up with headers (using the keywords you want to be found for). Headings are divided with a numbering system. Each page on your site should have a title in a “heading 1” tag (<h1>). WordPress has these listed in a dropdown menu and you can select to have the headers of each post be “heading 2” (and “heading 3″ or 4 if you have sub-heads in your sections).
The code that builds your post will look like this to search engines:
<h1>The main title of your blog post</h1>

Intro paragraph here

<h2>The heading of a section of a post</h2>

Paragraphs about this section. Etc.
For every image you add, include an “alt” tag. This is a bit of text that people who are using screen readers have access to, but won’t show in your post on your website. Search engines are also interested in this content, so describe your image, using your target keyword if it makes sense to.
17. Cross-link to other content on your site.
Sometimes in my post I will mention and link to another article on my site, to let people continue hanging out on my domain and getting to know what I do. When I don’t do that, I always set up related categories, tags, and related posts for people to read. If they liked what they read, they can read more things on the “branding” topic, more things in the “case study” category, or go directly to other posts about that topic.
Taking a moment to set up some, “if you liked this, you may also like” action on your site is a great way to keep people around a bit longer and warm them up to buying from you.
18. SEO-specific double check!
I use the Yoast plugin for WordPress to guide me in making my content Google-friendly. If you’ve done a good job on all the preceding points, Yoast will just give you a green light (literally!) and you’re good to go. If it gives you a red or a yellow light, read the tips offered and make some adjustments until you can get Yoast feeling happy.
Now you can press “Publish” and share your post with the world!
19. Notify anyone who was mentioned.
They’ll like to know that you’re blogging about them. They may share it with their readers right away, think about sharing this or other posts in the future, or just have a warm fuzzy feeling about you.
20. Go a step further and ask people to share.
Email people who have the same target audience that you do and are not competitors to ask them the favor of sharing your post. Offer to share theirs in return or another type of favor. I only do this maybe once a year when I have something huge or noteworthy, because I’d hate to wear out my welcome and I want to be sure the person who’s doing me the favor feels like they’re sharing something that their readers will truly find valuable.
I called in favors three times for my blog so far (after three and a half years blogging):
- When I launched my blog
- When we entirely redesigned Aeolidia and the blog and were having a huge giveaway celebration
- When I wrote the “260 blog post ideas” post, because that one was so valuable
Don’t ask strangers to do this for you. They aren’t going to. Ask friends, colleagues, people you’ve helped in the past, people you’ve blogged for or been interviewed by, etc. The person you ask has to know who you are and have at least a small warm feeling about you, or you’re wasting your time.
Don’t know anyone like this? Start socializing more on the internet and comment on their posts, ask them a question, offer them a tip. You’re not faking a friendship for business gain, but I can tell you you aren’t going to get far in blogging if you keep to yourself and never reach out to other people. Blogging is a social-type activity. Go say hi!
21. Go chat about your blog post on social media.
Now is the time to manually post to your favorite social media platform(s), pin your post to Pinterest, etc. Share that you wrote it and offer to answer questions about it, chat in more detail, see if people want to share it.
When we publish a new blog post, I manually post it to Instagram (with the help of CoSchedule to have my content all prepped). I then spend 5-10 minutes on Instagram liking and commenting on peoples’ posts. Some people will naturally glance at what you’ve been up to when you comment, like, or follow them. It’s the equivalent to smiling, shaking hands, or striking up a conversation at a networking event.
For goodness’ sake, please don’t post a string of “nice pic” comments on every single thing you see! It is only worth liking and commenting if you’re talking to people who you are actually interested in and who are interested in you, and if you’re sharing genuine comments. This is the “social” part of social media, where you’re participating instead of just broadcasting your own information.
I also post my new post to my own Facebook Group (The Shipshape Collective – join us!), because that’s one thing people are there for. Then we can discuss the post in more detail. I let automation tools take care of the rest, which the next tip is about.
22. Set up a social media schedule.
I do this before posting, but you can do it at any time. Use your social media scheduling tool of choice (I use CoSchedule, but there’s also Buffer, Edgar, TailWind, Later, etc.) to plan out when you want to re-share this post. You don’t want to be annoying and repetitive, but remember that social media is a stream and people aren’t on there all day every day. They each have a different pace that they go by at (for instance, Twitter content lasts just minutes to hours before it kind of “expires” and quits being seen, and it’s fine to re-post content you’ve posted before, for people who missed it the first time around.
23. Leverage your mailing list.
I’ve talked about using your blog post to get people to sign up for your mailing list. Well, you also want to use your mailing list to tell people about your blog posts. My mailing list sends almost 10% of my total traffic back to my site each month. It’s good for the people who are most interested in what you’re doing to see what’s new with you and your shop, and to be brought back to the site to order. Building up a large, healthy, engaged mailing list is a big big deal, and I will talk about that more on the Aeolidia blog in the future.
Share part of your blog post in your newsletter, an additional thought or info about the post, and send people to your site to read the rest and get started shopping.
24. See if anyone wants to syndicate it.
I mentioned this during the prep steps, but if a post of yours has been popular and you want it to reach a larger audience, make sure you have a strong call to action and think about who might want to post it again to their readers. Again, this should be someone who has the same target customer as you, but doesn’t feel like a direct competitor who wouldn’t want to support your business. And always consider what the person is getting out of it. They need a reason to want to help you.
It’s only helpful to syndicate your post on another site if you’re working in your post to bring people back to your site, so make sure your post includes a call to action that accomplishes that.
25. Write a spin-off.
If you’ve written a post that is evergreen (meaning it doesn’t get old or go out of date), think about what future posts you could write that could link back to that post (“if you liked this, you may also like,” or “I went in-depth about Topic X in this first post [link], and now here’s Topic Y based on that”).
26. Add it to an email series.
Again, if this is a big deal post that introduces people to what’s so great about your business, convinces people to buy, and is evergreen, you don’t want to show it to people once and then let it quietly disappear. If you have a mailing list, it’s often a good idea to set up an automated email series to introduce customers to your product line and your story. This blog post may be one you want to link to from the email, so all new subscribers have a chance to see it.
You did it!
Whew, your little baby blog post is off toddling in the world, and you’ve given it a much greater chance to grow up into a popular post, repinned thousands of times on Pinterest, ranked #1 for your keyword on Google, gone viral on Facebook, or shared by a famous blogger. Best of all, it’s a post that will make people buy your product and all your work has paid off. Way to go! Now do it again for your next post.
260 Blog Post Ideas for E-Commerce Businesses
In this downloadable PDF, I’ve put together 260 blog post ideas (which you could also use for your newsletter or Instagram), introduce you to 9 ecommerce blogs that are absolutely killing it, and give you an action plan for generating more ideas of your own and getting started.
260 Blog Post Ideas


A list of 260 blog post idea prompts for creative, product-based businesses that sell products online.
Browse Posts
Newsletter Sign Up
We write a new email each week to help you grow your business.
2 thoughts on “26 Ways to Make More Sales with Your Shopify Blog”
Leave a Comment

Let's take your online shop to the next level
The Shopify websites we design have a reputation for substantial improvements to ecommerce conversion rates and online sales. Let's talk!
That’s a wealth of information, Arianne. Thank you so much for sharing it all.
I’m so glad it was helpful, Anne!